Beginners Digital Photography: Week 1
I'm taking a beginners digital photography class at Lill Street Art Center. This is something I've always wanted to do, and it's also one of my 2014 New Year's Goals. I feel that knowing how to take great pictures can be very beneficial in life. Our minds can only retain so much, which is why it's important to document life's special moments whenever possible.
I don't expect to be a pro by the end of my 5 week class, but I do expect to learn a lot about my Canon EOS Rebel SL1, and become more comfortable taking manual photographs (which is what the whole class is about).
I've decided to document my weekly notes from class along with the assignments so I'll have a point of reference when this is all over. I also hope that this shared knowledge will inspire other rookie photographers!

Class notes
Use the following guidelines for taking a picture in Manual Mode (M):
Set the ISO Speed:
- The ISO setting on my camera is a stand alone button as well as a setting under the Manual menu.
- Use a low ISO Speed when natural light is available and a high ISO Speed when natural light isn't available (use ISO 100 when outside).
- The higher the ISO Speed, the more broken down the picture will be.

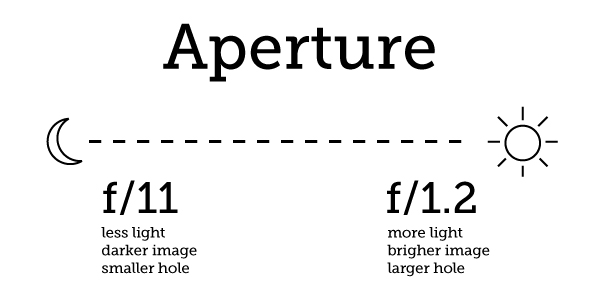
Set the F-Stop (Aperture):
- With a low F-Stop, the subject stands out with a blurred background. With a high F-Stop, there is a depth-of-field.
- The lower the F-Stop, the more light that will be allowed in. The higher the F-Stop, the less light that will be allowed in.
- For this week, we are keeping the F-stop at 6 or lower. The use of higher F-Stops will be covered later.
Set the Shutter Speed:
- Faster shutter speeds freeze moving objects. Slower shutter speeds create motion blur.
- 1/100 is a good place to start.
- Anything less than 1/60 would require a tripod.

Set the White Balance:
- White balance is important to see true color.
- Adjust the White Balance setting for natural colors under specific types of lighting.
- In many cases, AWB (Auto White Balance) will work.
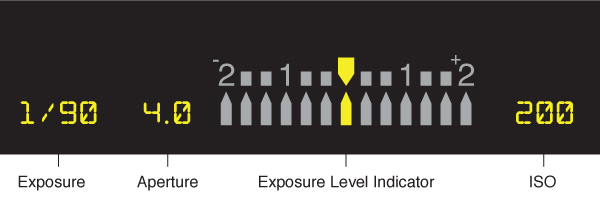
Adjust the Exposure Level:
- The ISO Speed, Aperture, and Shutter Speed all work together to control the exposure level.
- You want the exposure needle to land at 0 in your viewfinder.
- This can be accomplished by moving the dial on your camera to adjust the Shutter Speed (after you have determined the appropriate ISO and Aperture).
Assignment
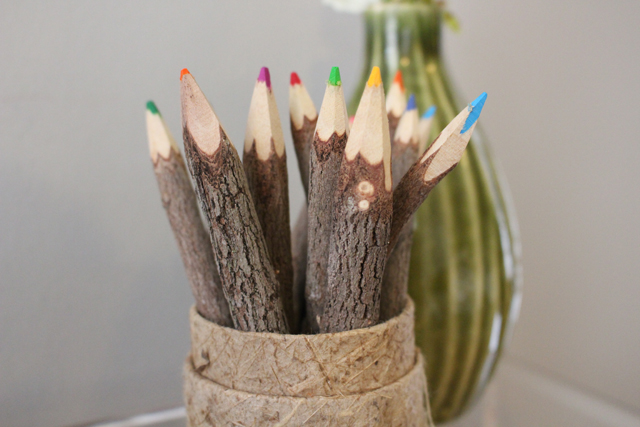
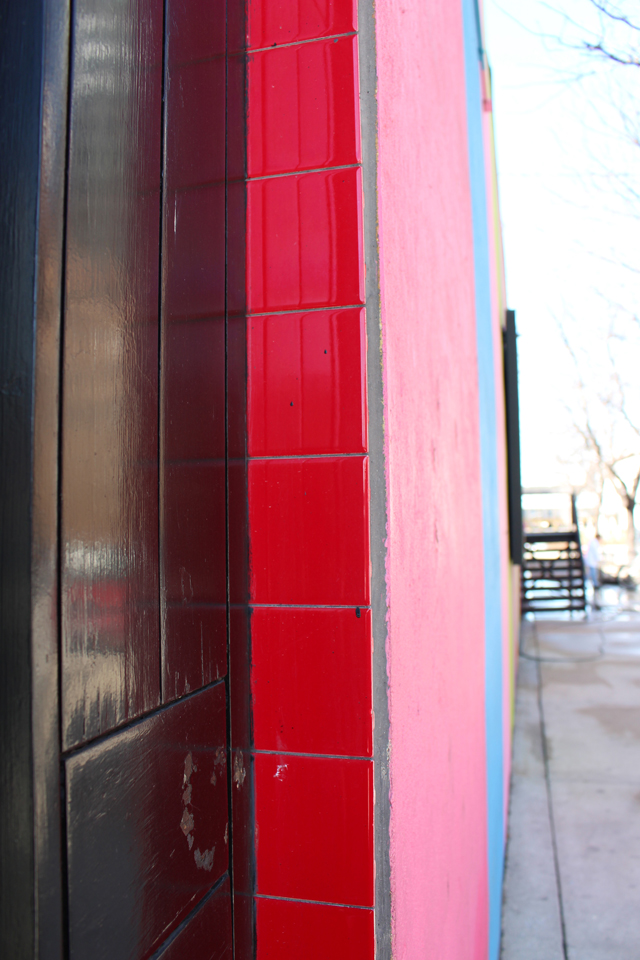
Our assignment for Week 1 was "Finding Color". We were asked to bring in +/- 10 pictures (unedited and uncropped) to share with the class. The pictures should vary from inside to outside and natural light to unnatural light.
My Photos

ISO Speed: 100 F-Stop (Aperture): f/4.5 Shutter Speed: 1/250
ISO Speed: 3200 F-Stop (Aperture): f/4.5 Shutter Speed: 1/100
ISO Speed: 100 F-Stop (Aperture): f/4.5 Shutter Speed: 1/80

ISO Speed: 1600 F-Stop (Aperture): f/4.5 Shutter Speed: 1/200

ISO Speed: 3200 F-Stop (Aperture): f/4.5 Shutter Speed: 1/100

ISO Speed: 3200 F-Stop (Aperture): f/4.5 Shutter Speed: 1/80

ISO Speed: 100 F-Stop (Aperture): f/4.5 Shutter Speed: 1/160

ISO Speed: 100 F-Stop (Aperture): f/5 Shutter Speed: 1/250